A Lazy Girl's Guide to Setting Up Jupyter on EC2 for Deep Learning
TL;DR: I describe how I set up a Jupyter server on EC2 with a Marketplace AMI (so we don’t have to install too much stuff ourselves) so we can speed up the training of our NN without leaving the convenient workflow of a Jupyter notebook.
![]()
Getting started with deep learning is quite easy these days given all the available material out there. I got inspired to build my first convolutional neural network for sentiment analysis after reading this paper by Kim (2014) and attending a PyData meetup with a keras demo (more about this maybe in another post).
Given the experimental nature of my enterprise I started out directly in a Jupyter notebook running locally on my Mac. However, after building more and more layers with more and more filters and starting to tune the hyperparameters for my networks, I noticed that the training time is starting to slow me down. Hence, it was time to move to an AWS EC2 machine with a dedicated GPU to speed up my experiments. In the following I will describe the steps I took to get to the point of training a NN with keras in a Jupyter notebook running on an EC2 instance.
Prerequisites: I assume in this post you already know how to set up an EC2 instance with your credentials so that you can access the instance once it has booted up. I also assume you know how to work with virtual environments for Python and you know the general workflow of installing Python packages. If not you can easily find some articles explaining the purpose of virtual environments.
1. Launch an EC2 Instance With a Suitable AMI
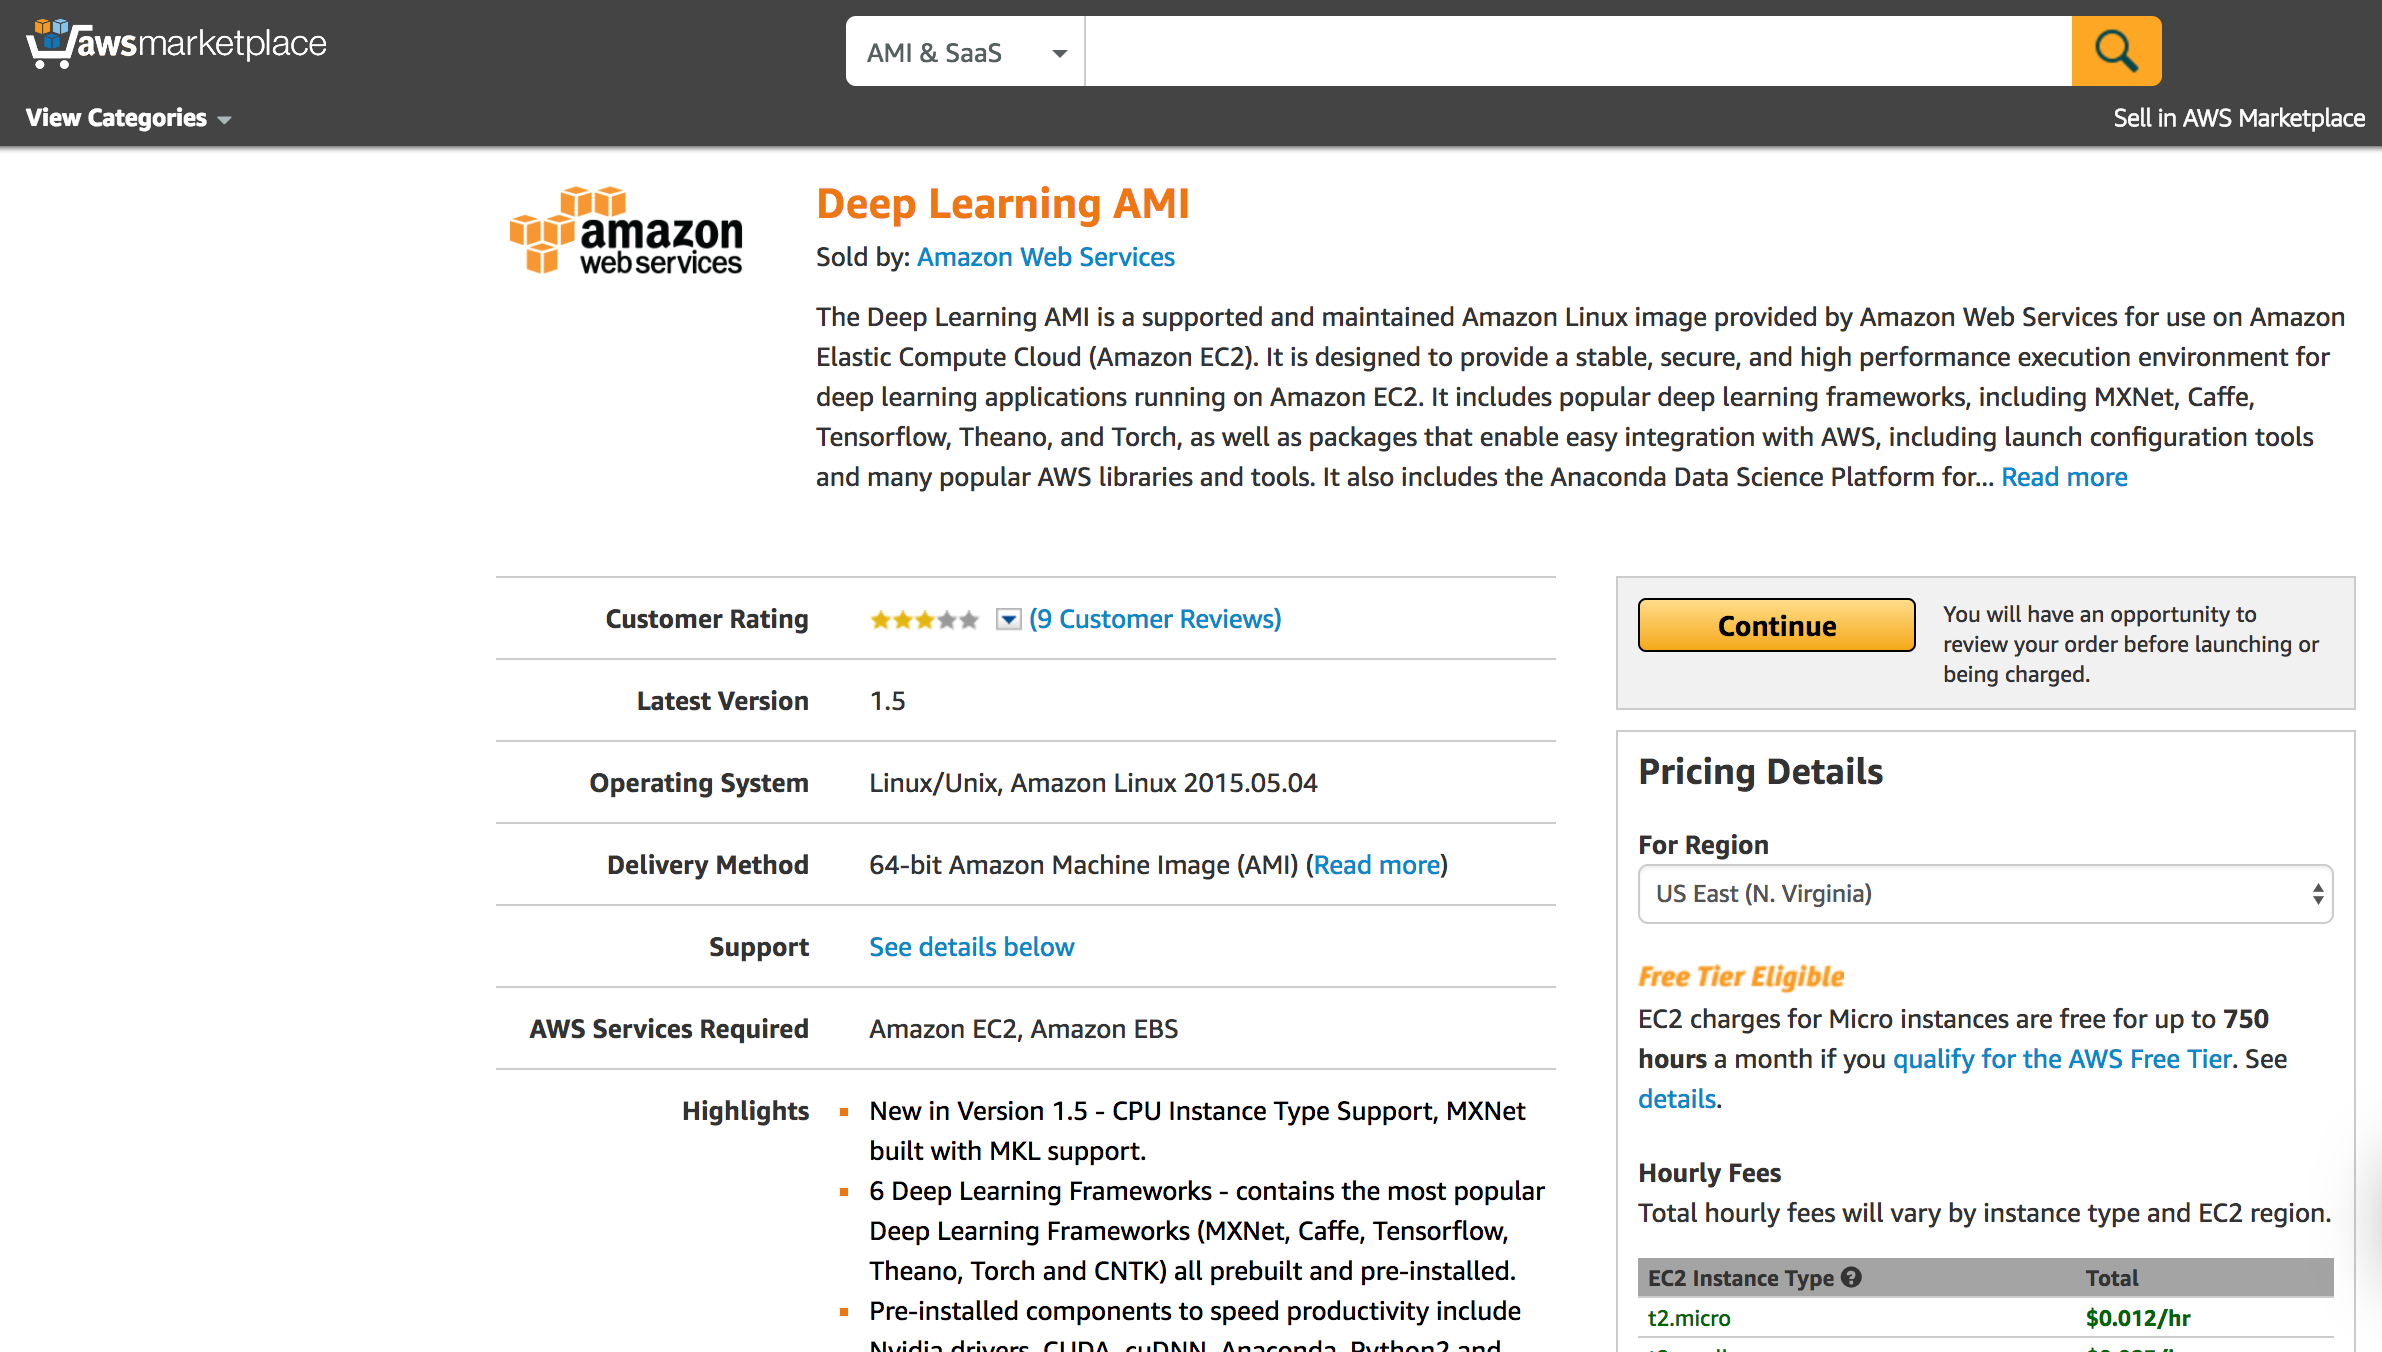
Choosing the right AMI (Amazon Machine Image) will save us a lot of installation effort and time. Since our goal is to do some deep learning, I suggest looking for an AMI that comes with the deep learning library of your desire. In my case I wanted to use either tensorflow or keras with a tensorflow backend. Some searching in the AWS Marketplace reveals that Amazon’s Deep Learning AMI and Bitfusion Ubuntu 14 TensorFlow AMI are nice options. In the end I opted for the Amazon AMI and installed keras myself (see next step). Jupyter is also already preinstalled on both.
(If you are not sure yet which libraries you will need, you can also use a vanilla Linux AMI and install everything you need later on the command line. But since this is the lazy girl’s guide we want to spend as little time as possible on installation of tools.)
After choosing the AMI we also need to choose the right instance type. Reasonable choices are the g2 and p2 instances, both of which have dedicated GPUs. I opted for a p2 machine, since they are newer and basically designed for the best deep learning performance.
We need to create a new security group with some specific rules as we want to be able to access the Jupyter server from our browser via HTTPS later on. The following rules will be added to the security group.
| Type | Protocol | Port Range | Source |
|---|---|---|---|
| HTTPS | TCP | 443 | 0.0.0.0/0 |
| SSH | TCP | 22 | 0.0.0.0/0 |
| Custom TCP Rule | TCP | 8888 | 0.0.0.0/0 |
All of the steps described above can be summarised in the following CLI commands if you don’t want to go through the launch wizard in the web console:
# create security group
aws ec2 create-security-group --group-name JupyterSecurityGroup --description "My Jupyter security group"

# add security group rules
aws ec2 authorize-security-group-ingress --group-name JupyterSecurityGroup --protocol tcp --port 8888 --cidr 0.0.0.0/0
aws ec2 authorize-security-group-ingress --group-name JupyterSecurityGroup --protocol tcp --port 22 --cidr 0.0.0.0/0
aws ec2 authorize-security-group-ingress --group-name JupyterSecurityGroup --protocol tcp --port 443 --cidr 0.0.0.0/0

# launch instance
aws ec2 run-instances --image-id ami-41570b32 --count 1 --instance-type p2.xlarge --key-name <YOUR_KEY_NAME> --security-groups JupyterSecurityGroup
ami-41570b32 is the identifier for the Deep Learning AMI in the eu-west-1 region. The launch command will return a bunch of information about the new instance. Find the InstanceId in the output (somewhere in the bottom). Using this instance id we can find out the public IP address and DNS name of our machine with the following command. We will use this later to access the machine. (Or browse through the EC2 overview in the web console to find the same information.)
aws ec2 describe-instances --instance-ids <INSTANCE_ID>
2. Set up the Environment on the Remote Machine
Let’s ssh to the instance using its DNS name.
ssh -i <PATH_TO_PEM> ec2-user@ec2-xx-xxx-xx-xxx.eu-west-1.compute.amazonaws.com
As is common practice with Python we will do everything from within a virtual environment (even though it’s probably not necessary here since this machine only has one purpose, namely to run our notebook). I will use Anaconda as my environment management tool but you can choose any tool of your choice as long as you know how to use it. With the preinstalled Anaconda distribution I will activate the default environment named root:
source src/anaconda3/bin/activate root
Note that I activated the Anaconda 3 default environment, which by default uses Python 3.5. If you prefer to use Python 2.7 (but why?), you can do the same thing with the preinstalled Anaconda 2 distribution in src/anaconda2.
Let’s make sure that we are indeed using the correct binaries by checking the following:
> which python
~/src/anaconda3/bin/python
> which pip
~/src/anaconda3/bin/pip
> which jupyter
/usr/local/bin/jupyter
Here we can see that we are actually not using the jupyter in our environment. This can be fixed by prepending to the PATH variable. Open ~/.bash_profile and change the PATH definition to the following:
PATH=$HOME/src/anaconda3/bin:$PATH:$HOME/.local/bin:$HOME/bin
export PATH
Now let’s source the updated .bash_profile:
source ~/.bash_profile
Verify that you are now using the correct jupyter.
> which jupyter
~/src/anaconda3/bin/jupyter
Now it’s time to install keras, which is very straightforward with to do with pip. You can skip this step if you don’t require any additional libraries, or you can install some custom libraries of your own.
pip install keras
3. Configure the Jupyter Server
We will now generate the configuration file for our Jupyter server. Since we are using HTTPS we have to create a certificate first. We will use Python to generate a key based on a password you can choose for yourself. We will tell the server that this password will be required to access the notebooks.
Or: just execute the commands given below, follow the instructions on the command line (for the very lazy ones: you can also leave all the prompts empty) and things will just magically work.
jupyter notebook --generate-config
key=$(python -c "from notebook.auth import passwd; print(passwd())")
cd ~
mkdir certs
cd certs
certdir=$(pwd)
openssl req -x509 -nodes -days 365 -newkey rsa:1024 -keyout mycert.key -out mycert.pem
cd ~
sed -i "1 a\
c = get_config()\\
c.NotebookApp.certfile = u'$certdir/mycert.pem'\\
c.NotebookApp.keyfile = u'$certdir/mycert.key'\\
c.NotebookApp.ip = '*'\\
c.NotebookApp.open_browser = False\\
c.NotebookApp.password = u'$key'\\
c.NotebookApp.port = 8888" .jupyter/jupyter_notebook_config.py
4. Run the Jupyter Server
Before starting the server, it is advisable to use some kind of session management tool to keep the server running after a user logout. I usually use screen but here also you can choose whichever tool you like.
screen -S jupyter
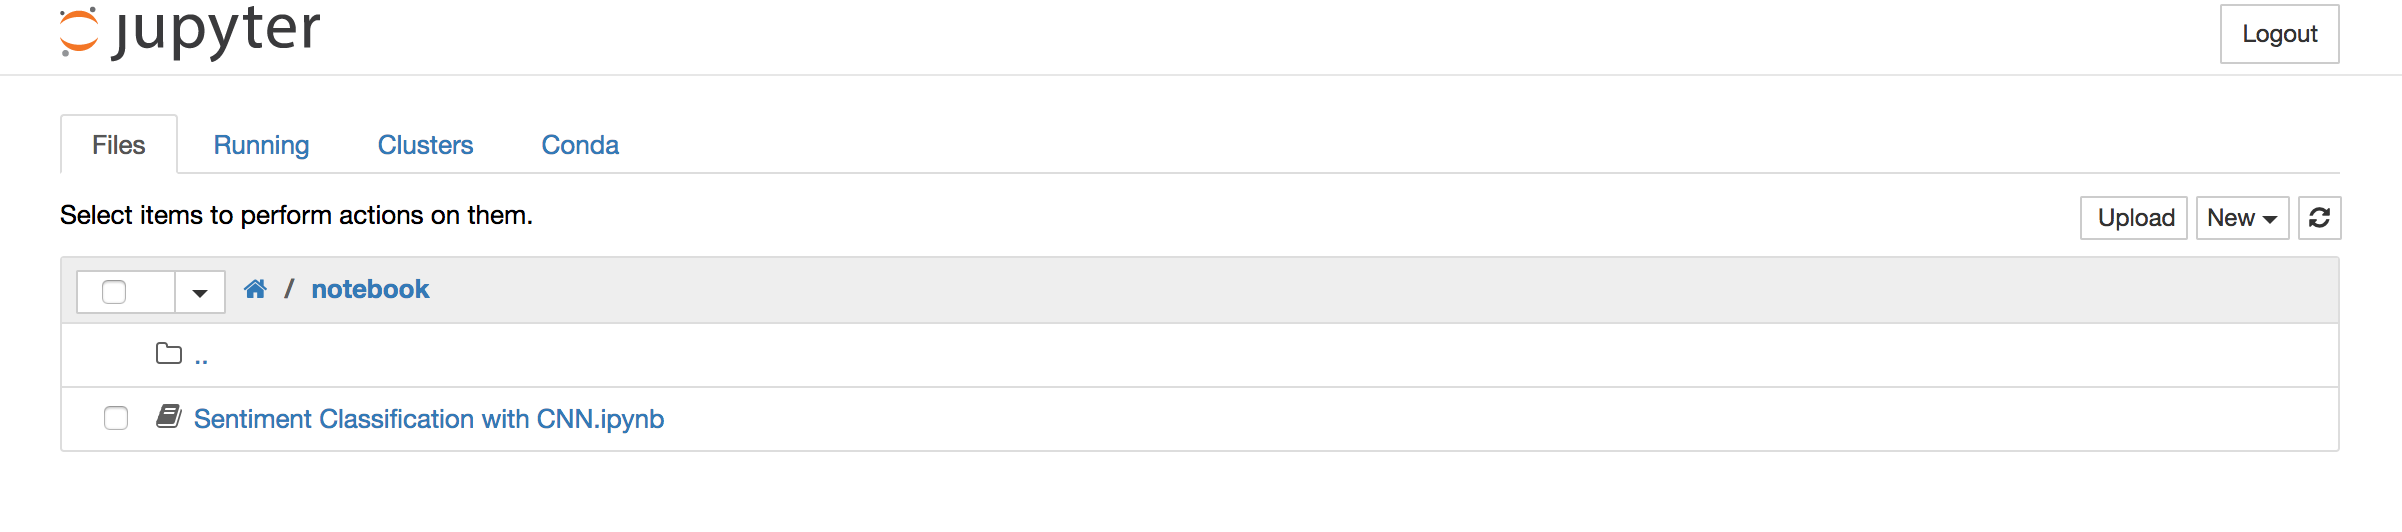
mkdir notebook
cd notebook
jupyter notebook
If you want to test the server with a notebook of yours immediately, now would be a good time to copy a notebook over to the server with scp. If you don’t have one at hand, you could copy an example notebook that I prepared. This notebook builds a very standard CNN for the MNIST dataset and reaches 99% accuracy on a test set after 12 training epochs.
git clone git@github.com:kenophobio/keras-example-notebook.git
scp -i <PATH_TO_PEM> keras-example-notebook/Vanilla+CNN+on+MNIST+dataset.ipynb ec2-user@ec2-xx-xxx-xx-xxx.eu-west-1.compute.amazonaws.com:./notebook
Your Jupyter server should now be accessible in your browser with this URL: https://<your-instances-public-ip>:8888. And if you’ve copied the notebook over to the EC2 instance, you should be able to run your notebook now in the browser.
5. Have Fun Experimenting with NNs
The only thing I still had to do is to make keras use tensorflow as the backend library by modifying the config file ~/.keras/keras.json (you have to create it if it isn’t already there). Or just stick with the theano backend, which is also already installed.
{
    "image_dim_ordering": "tf",
    "epsilon": 1e-07,
    "floatx": "float32",
    "backend": "tensorflow"
}
The first time you import keras, the console should tell you which backend you are currently using as well as some output indicating that you are using the GPU via CUDA (if not, try importing keras in the Python interpreter).
We’re done! Have fun experimenting with your NNs!